 Image credits: https://science.howstuffworks.com/terraforming.htm
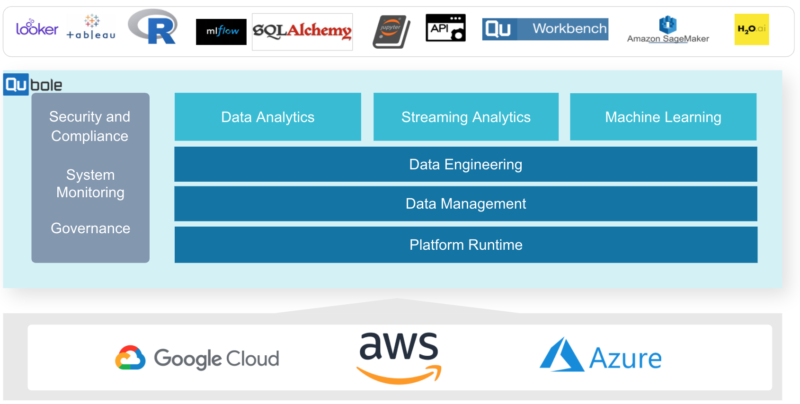
The Qubole Open Data Lake Platform
Qubole is an open data lake company that provides a simple and secure data lake platform for machine learning, streaming, and ad-hoc analytics. No other platform provides the openness and data workload flexibility of Qubole while radically accelerating data lake adoption, reducing time to value, and lowering cloud data lake costs.
Qubole’s Platform provides end-to-end data lake services such as cloud infrastructure management, data management, continuous data engineering, analytics, and machine learning with near-zero administration.
What is Terraform
Terraforming (literally, “Earth-shaping”) of a planet, moon, or other body is the process of deliberately modifying its atmosphere, temperature, surface topography, or ecology to be similar to the environment of Earth to make it habitable by Earth-like life[1].
If you think about it – when an organization starts building its infrastructure on a public cloud, all it gets is a moonscape and it is the organization’s DevOps team’s responsibility to create an infrastructure ecosystem of cloud resources that various teams can “inhabit” and deploy their work.
 This is what the wonderful folks at Hashicorp have facilitated with Terraform. Terraform is a tool for building, changing, and versioning infrastructure safely and efficiently. Terraform can manage existing and popular service providers as well as custom in-house solutions.
This blog is structured in 3 sections (one for each of our supported public clouds). You are welcome to read all 3 sections but feel free to jump to the cloud that is more relevant to your current situation.
AWS Terraform
Terraforming Qubole into your Cloud Ecosystem
Getting started with Qubole is a straightforward process. The steps can be studied in our documentation. In essence, it is a 3 step process:
- Account Integration: authorize Qubole to orchestrate the open data lake in your AWS cloud account. This entails setting up IAM Roles and creating an S3 bucket for use by Qubole.
- Network Integration: set up the required networking infrastructure. To process the data in the data lake, Qubole orchestrates big data engines in your cloud account. This requires a VPC, Subnets, Endpoints, Security Groups, Route Tables, NAT Gateways, Internet Gateways, and a Bastion Host for secure access.
- Hive Metastore Integration: A data lake’s central source of truth is a metastore. Qubole advocates the use of the Hive Metastore. Qubole provides one out of the box. However, it is recommended that a self-hosted metastore be used. This entails creating VPC, RDS, DB Subnets, DB Subnet Security Groups. It further requires initializing the RDS with the Hive Metastore Schema and peering at the RDS with the Data Lake’s Network Infrastructure for secure access.
Here is a reference architecture of what a fully integrated Qubole Environment looks like:
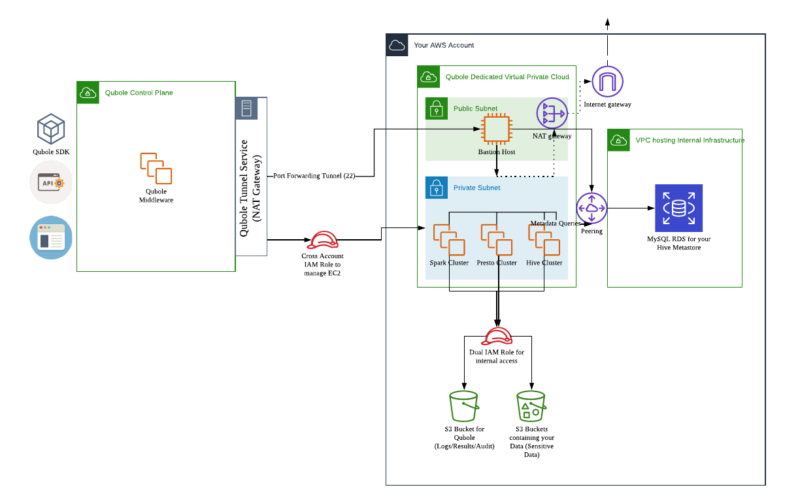
As observed, this requires provisioning and orchestrating many AWS Cloud Resources. Moreover, organizations tend to have different Qubole accounts per line of business or per team. This means that the same steps need to be repeated every time.
Hence, we have created Terraform Scripts that allow DevOps teams to define the Qubole Open Data Lake Infrastructure setup as code for easy versioning, provisioning, and reuse.
The above 3 steps are defined as independent modules in this Terraform Repository. They can all be used in one go, or one by one.
The modules are open and transparent. They can be imported into existing Terraform setups. They can be modified as per internal engineering guidelines as long as the minimum Qubole requirements are met.
Let us look at how Terraform can be used to instantiate the Qubole Open Data Lake on AWS Cloud.
Download Qubole – AWS Terraform Scripts
Checkout the Qubole Terraform repository or contact us for Qubole Terraform scripts.
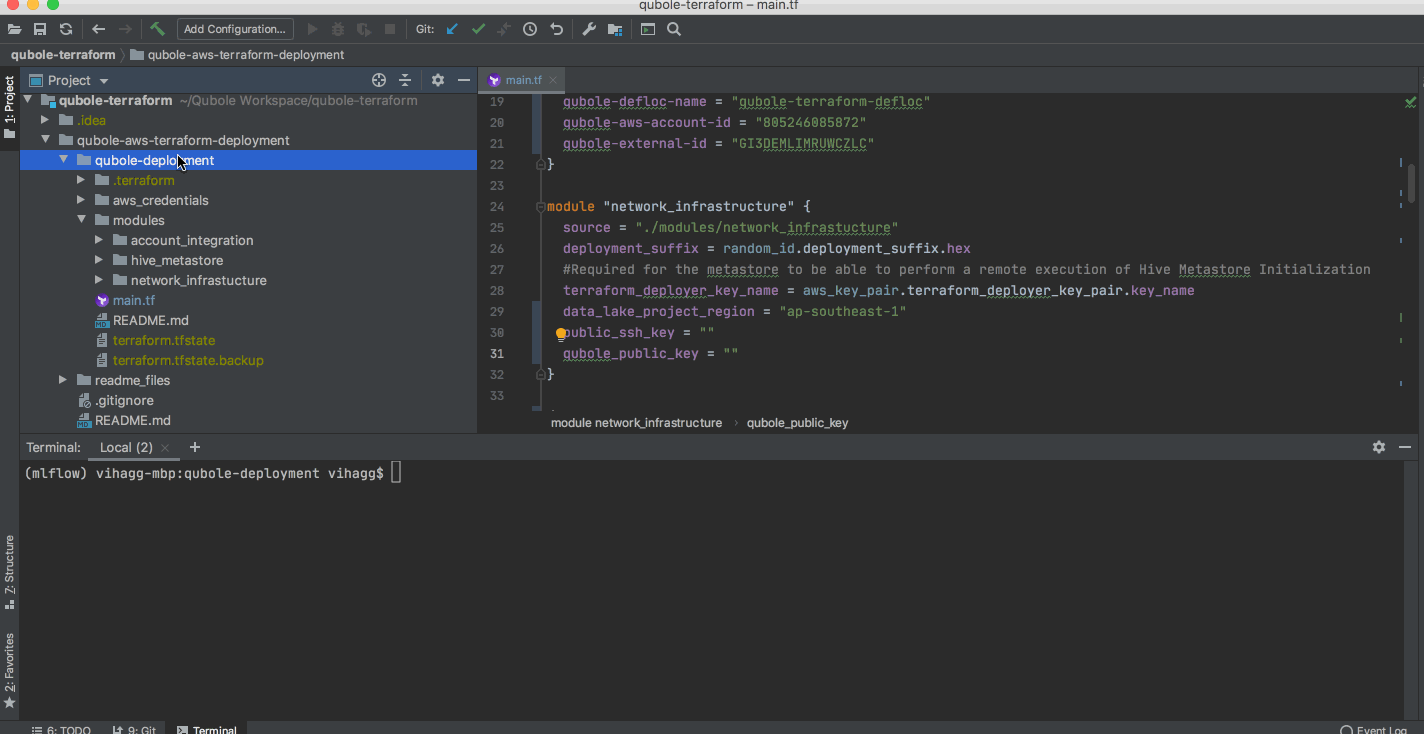
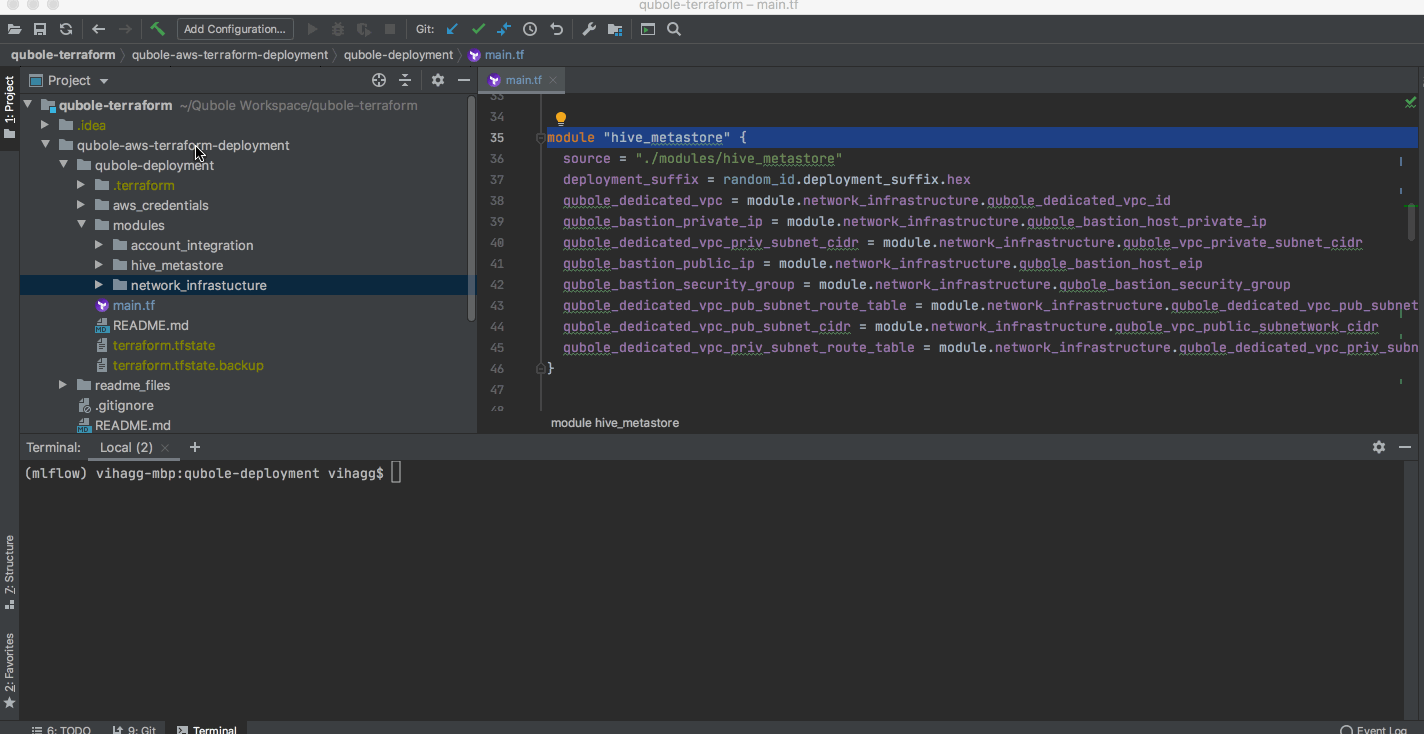
Once available, navigate to qubole-aws-terraform-deployment/qubole-deployment.
A convenience “main.tf” file for quickly getting started with the Terraform Deployment.
If a Terraform Deployment already exists in the environment, the contents of the “main.tf” file can be used as an example for working with the modules.
Account Integration
In the Account Integration, two tasks are performed.
- The Qubole Account, uniquely identified by a combination of a “Trusted Principal AWS Account ID” and an “External ID” is authorized to orchestrate cloud resources in your AWS account. This authorization comes in the form of a Dual IAM Role setup. Please see this document to learn how it works.
- The Qubole Account is provided with access to a dedicated S3 bucket. In Qubole parlance, it is called the account’s “default location”. Please see this document to understand its significance.
The “modules” folder contains the required module for the account integration scripts – the “account_integration” module.
If required, edit the EC2 and S3 IAM Policy documents in the “policies” folder.
- The S3 Policy documents can be used to authorize Qubole Clusters to access required buckets
- The EC2 Policy documents can be used to restrict EC2 Policy Scope.
The Terraform Scripts will suffix a “deployment suffix” to all the resources for easy identification and tagging.
As shown in the following demonstration:
- Fetch and apply the Qubole AWS Account ID and Qubole External ID from your Qubole Account into the account_integration module variables.
- Apply the Terraform Script.
- Fetch the Cross-Account IAM ARN and Qubole Defloc from the Terraform output and apply them to your Qubole Account to complete the integration.

Network Integration
In the Network Integration, two tasks are performed.
- An AWS VPC is set up for use by Qubole. This VPC is set up with the Bastion Node access pattern. Please see this document to understand the architecture and network components.
- A Bastion Host is set up in the public subnet of the VPC for secure access from the Qubole Control Plane.
The “modules” folder contains the required module for the network infrastructure and integration scripts – the “network_infrastructure” module.
As shown in the following demonstration:
- Fetch and apply the account level SSH key into the network_infrastructure variables. See this documentation for instructions.
- Fetch and apply the Qubole SSH key into the network_infrastructure variables. It can be obtained from any cluster’s Advanced Configuration page.
- Edit the deployment region.
- Additionally, edit and apply the following variables:
- qubole_tunnel_nat: See this document to get the list of IP addresses for the Qubole deployment being used.
- bastion_ami: See this document. Edit and apply the AMI ID applicable for the deployment region
- bastion_instance_type: See this document for instance type recommendations.
Hive Metastore Integration
This is an optional module. Qubole requires the presence of a Hive Metastore per account.
- Qubole provides a default Hive Metastore out of the box
- This can be overridden with a self-hosted Hive Metastore if required
If a Hive Metastore is already present, it can be integrated with the Qubole Account as described in this document.
If a new Hive Metastore has to be created, the “hive_metastore” module can be used to set it up. It is best used in conjunction with the “network_infrastructure” module.
The following actions are taken:
- A MySQL RDS instance is instantiated in a dedicated VPC
- The RDS instance is initialized as a Hive Metastore
- This VPC has peered to the VPC for Qubole
As shown in the following demonstration:
- If the network_infrastructure module was used to create the Qubole dedicated VPC, use the module outputs as inputs to Hive Integration
- Additionally, edit and apply the following (self explanatory) variables:
- db_primary_zone
- db_secondary_zone
- db_instance_class
- hive_user_name
- hive_user_password
- hive_db_name
- hive_metastore_vpc_cidr
- hive_metastore_vpc_primary_subnet_cidr
- hive_metastore_vpc_secondary_subnet_cidr
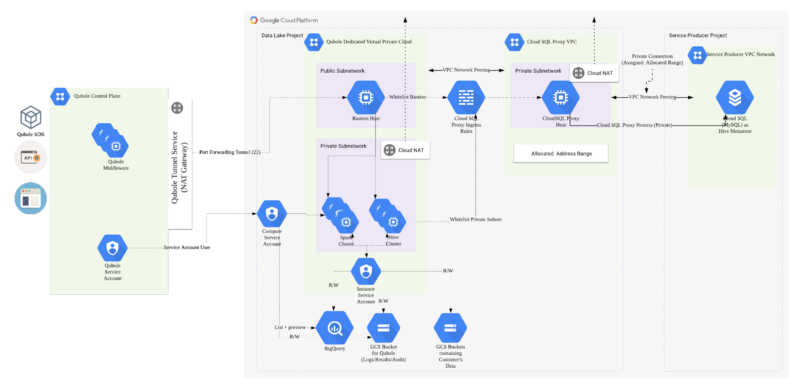
GCP Terraform
In the 1st part, we saw how we can implement the Open data lake Architecture on AWS. Given Terraform is cloud-agnostic we will now see how we can use Terraform to build an open Data lake architecture on the Google Cloud Platform.
As part of this implementation we will focus on 3 modules:
- Account Configuration: This module will create Instance service accounts and Compute Service which will be used to provide access to Cloud Storage and BigQuery and orchestrate the compute managed by Qubole.
- Network Infrastructure: This module will implement the security controls necessary for a Data Lake architecture which includes VPC, subnets firewall rules, and Bastion host.
- Hive Metastore: This module will implement the CloudSQL (MySQL) instance and enable access to it via cloud SQL proxy https://cloud.google.com/sql/docs/mysql/sql-proxy
Qubole recommends sizing the MySQL instance (throughput) and implementing monitoring capabilities on MySQL.
Here is a reference architecture of how a fully integrated Qubole Environment looks like:
Download Qubole – Terraform Scripts
Checkout the Qubole Terraform repository or contact us for Qubole Terraform scripts.
A convenience “main.tf” file for quickly getting started with the Terraform Deployment.
Account Integration
Pre-requisites
- The Google service account credentials will be used to create the infrastructure.
- GCP project name and number.
- Qubole service account which will be added as a user to the Compute and Storage Service Accounts.
As part of the account integration module, we perform the following tasks:
- Creation of Qubole Custom Compute Role and Qubole Custom Storage Role.
- Creation of a Compute Service Account(CSA) which will be used to spin up clusters in the project.
- Creation of Instance Service Account (ISA) which will be used to autoscale clusters based on workload and SLA.
- Configuration of storage access to the data buckets and default location buckets.
- Association of BigQuery permissions with the service accounts, for BigQuery access.

Network Integration
As part of Network Integration, we will
- Setup a VPC Network with a public and private subnet.
- Setup a Bastion host in the public subnet and whitelist Qubole ingress to it.
- Setup a Cloud NAT to allow clusters spun up in the private subnet access to the internet.
Hive Metastore Integration
This is an optional module if you already have a hive metastore or if you want to use the Qubole-hosted metastore. For existing metastores you can connect it to QDS.
If you are setting up a new metastore, this module will:
- Setup a Cloud SQL Instance hosting the Hive Metastore, exposed via a Cloud SQL Proxy Service.
- Peer the Cloud SQL Proxy VPC to the Qubole Dedicated VPC for secure access.
- Whitelist Bastion ingress and private subnet ingress to the Cloud SQL Proxy Service
- Setup a Private IP connection between the SQL proxy and the Cloud SQL instance for maximum security and performance.
Key Considerations for Cloud SQL Proxy:
- Cloud SQL proxy provides fast, secure, encrypted connections to Cloud SQL database instances, without any need to manage allowed IP addresses or SSL/TLS configuration details.
- The proxy service runs on a VM instance and it is critical to size the VM instance for performance and throughput.
- For production environments, it is recommended that you leverage the Cloud SQL Proxy best practices.
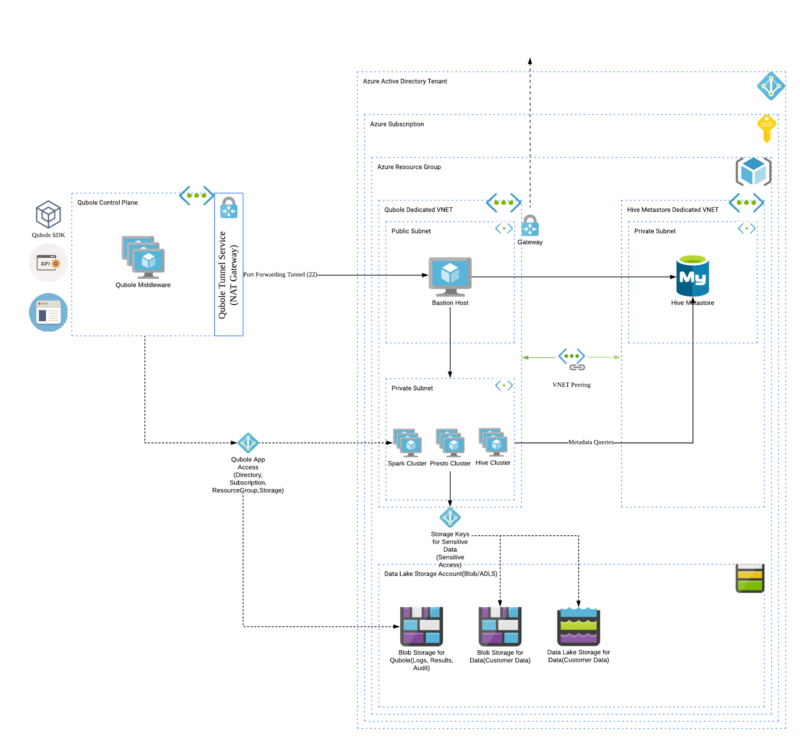
Azure Terraform
In the above sections, we saw how we can set up Qubole on AWS and GCP using Terraform. Terraform being cloud-agnostic we will now see how we can use it to set up on Azure Cloud and configure Qubole Control Plane to be able to spin up clusters in your Azure cloud account.
Pre-requisites
- You should have an Active Azure Subscription in which you would like to configure for Qubole. Please note the subscription_id to add to the main.tf file
- You must have an Active Qubole Account and use this API to fetch the unique Qubole Account SSH key to add this in the main.tf file for the variable public_ssh_key
- Finally, also note the Qubole Public SSH Key from your Qubole Account in the Cluster Advanced Security Settings as described in Step 3. here and add this to the main.tf file for the variable qubole_public_key
The following modules help setup Azure Cloud account for Qubole securely:
- Account Integration: This module will create a Service Principal in the Azure Active Directory Subscription, Resource Group, Storage Account within the Resource Group, and Storage Container to allow the clusters to write audit data, command logs/results/resources into the Storage Container. It will also add appropriate ‘Roles’ to the Resource Group for the Service Principal and thus orchestrate the compute, fully managed by Qubole.
- Network Infrastructure: This module implements a dedicated VNET, public and private subnets within this dedicated VNET, required network interface cards, network security groups for each subnet with appropriate ingress and egress rules, a virtual machine in the public subnet to make SSH calls in the Private Subnet i.e. Azure APIs to spin-up clusters in the Private Subnet also known as Bastion Host and a script to initialize the Bastion Host with SSH keys as authorized_keys.
- Hive Metastore: This module is intended to implement the Azure SQL (MySQL) instance and enables access to allow Azure services and resources to access this server, Qubole recommends sizing the MySQL instance (throughput) and implementing monitoring capabilities on MySQL. Please refer to the documentation here for metastore DB scripts
Here is a reference architecture diagram of what a fully integrated Qubole Environment looks like:
Download Qubole – Azure Terraform Scripts
Checkout the Qubole Terraform repository or contact us for Qubole Terraform scripts.
Once available, navigate to qubole-azure-terraform-deployment/qubole-deployment.
Locate the “main.tf” file for quickly getting started with the Terraform Deployment.
If a Terraform Deployment already exists in the environment, the contents of the “main.tf” file can be used as an example for working with the modules.
Account Integration
As discussed in the prerequisites section above, please update the subscription_id, public_ssh_key, and qubole_public_key in the main.tf file. The following setup steps are applied with this module:
- Create a Service principal for Qubole App
- Create a dedicated Resource Group with a ‘Contributor’ Role assignment to the Service Principal
- Create a dedicated Storage Account and Storage Container
The Terraform Scripts will suffix a “deployment suffix” to all the resources for easy identification and tagging.
The following GIF demonstrates the Account Integration module implementation:
Network Integration
In the previous step, we implemented Account Integration and in this step, we will demonstrate how to terraform stitches the network setup in the resource group configured above. Qubole recommends setting up public and private subnets and spin-up compute clusters in the private subnet which secures your data plane in the azure cloud. Qubole Control plane will interact with a private subnet cluster through the Bastion Host in the public subnet.

Hive Metastore Integration
This is an optional module. Qubole requires the presence of a Hive Metastore per account.
- Qubole provides a default Hive Metastore out of the box
- This can be overridden with a self-hosted Hive Metastore if required
If a Hive Metastore is already present, it can be integrated with the Qubole Account as described in this document.
Azure Qubole Terraform Deployment Summary
Using the DRY principle promoted by Terraform, we demonstrated how you can create re-usable, customizable Terraform modules that
- Create Azure Active Directory Application
- Allow a Qubole Dedicate Resource Group to contribute to this
- Allow the clusters to write audit data, command logs/results/resources into BlobStorage
- Create infrastructure dedicated for use by Qubole(hence isolating it from other resources)
- A dedicated Virtual network with a public and private subnet
- A bastion host for securing communications with Qubole
iii. Associated network security group rules to secure inter-component communications
To Deploy the above demonstration of the terraform modules, perform the following steps:
- Navigate to the qubole-deployment folder
- Edit the main.tf to choose which modules to deploy
- Review the variables in each module and update as required
- Run the following commands:
- terraform init
- terraform plan
- terraform apply
Conclusion
In conclusion, we saw how Terraform can be used by DevOps teams to seamlessly include the Qubole Open Data Lake Platform Cloud Components into existing Terraform setups.
These scripts can be used to set up Qubole Accounts across multiple lines of businesses easily in an automated fashion as part of Continuous Integration & Continuous Delivery.