Airflow Architecture diagram for Celery Executor-based Configuration
Airflow Architecture Diagram
Before we start using Apache Airflow to build and manage pipelines, it is important to understand how Airflow works. Understanding the components and modular architecture of Airflow allows you to understand how its various components interact with each other and seamlessly orchestrate data pipelines.
Airflow Architecture:
- Web Server: This is the UI of Airflow, that can be used to get an overview of the overall health of different Directed Acyclic Graphs (DAG) and also help in visualizing different components and states of each DAG. The Web Server also provides the ability to manage users, roles, and different configurations for the Airflow setup.
- Scheduler: This is the most important part of Airflow, which orchestrates various DAGs and their tasks, taking care of their interdependencies, limiting the number of runs of each DAG so that one DAG doesn’t overwhelm the entire system, and making it easy for users to schedule and run DAGs on Airflow.
- Executor: While the Scheduler orchestrates the tasks, the executors are the components that actually execute tasks. There are various types of executors that come with Airflow, such as SequentialExecutor, LocalExecutor, CeleryExecutor, and the KubernetesExecutor. People usually select the executor that suits their use case best. We will cover the details later in this blog.
- Metadata Database: Airflow supports a variety of databases for its metadata store. This database stores metadata about DAGs, their runs, and other Airflow configurations like users, roles, and connections. The Web Server shows the DAGs’ states and their runs from the database. The Scheduler also updates this information in this metadata database.
Let’s cover each of these components in detail.
Airflow Web Server:
Airflow’s Web Server comes with a well-equipped built-in user interface that provides control over each pipeline, including the ability to visualize various aspects of them. The most important capabilities of a Web Server are:
- Monitoring DAGs: The Airflow Web Server homepage provides a brief overview of the statuses of the DAGs and their recent runs.
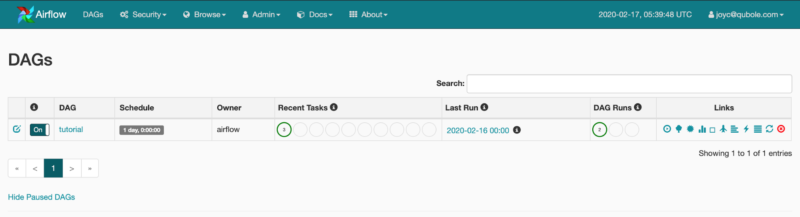
 Airflow Web Server HomePage Showing a List of DAGs and statuses of their most recent runs
Airflow Pipelines:
- Visualizing DAGs: The UI also has a section for visualizing the DAG flow, a tree view to represent all the recent runs, and the status of each task for these runs. One can also view other things like the DAG code, time taken by each task for each run, logs, and more to help debug DAG runs.
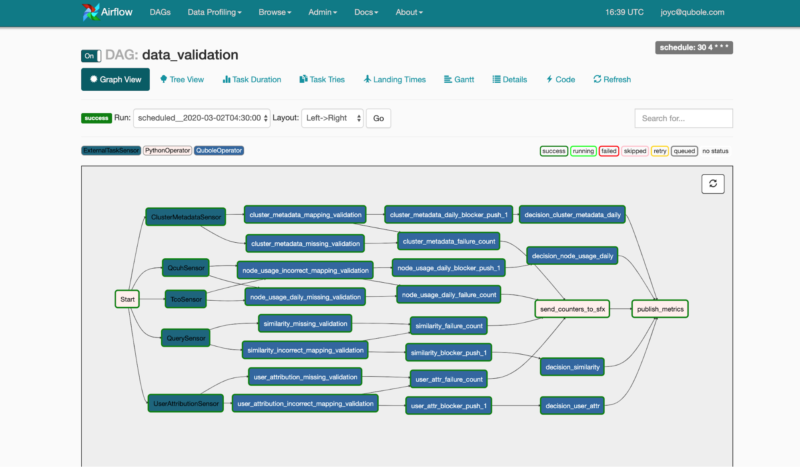
 Airflow UI showing a graphical representation of a DAG
Airflow DAG
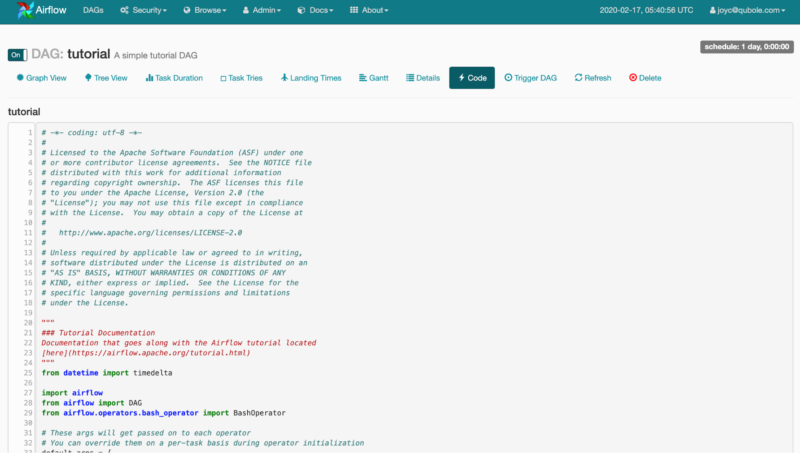
 Viewing DAG Code from Airflow UI
Airflow Components
- API Endpoints: Airflow Web Server also provides a set of REST APIs that can be used to perform various tasks like triggering DAGs, tasks, or getting the status of each task instance.
- Configuration Management: The Web Server UI also provides options to manage various configs like variables, and connections and view the Airflow default configuration on the UI itself.
- User Management: Airflow Web Server also comes with an option to enable Role-Based Access Controls (RBAC). One just needs to set
`webserver.rbac`it to True in order to enable this interface. It provides the ability to manage user permissions at a very granular level. We can even restrict if someone can trigger/view a DAG.
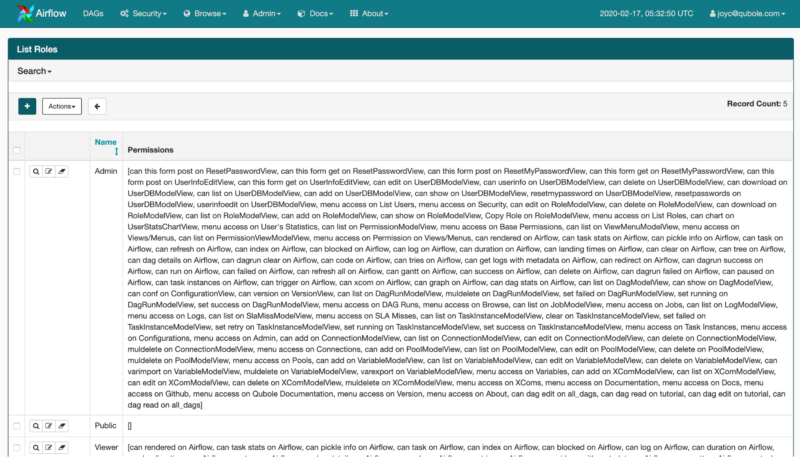
 Managing Roles on the Airflow Web Server UI
Airflow Roles
Airflow Scheduler:
The scheduler is at the core of Airflow and manages anything and everything related to DAG runs, tasks, the task runs, parsing, and storing DAGs while also taking care of other aspects like worker pool management, and SLAs, and many more.
The scheduler is a multi-threaded python process that keeps on checking and parsing all the code present in the Airflow DAGs folder. Based on the configuration, each DAG gets a number of processes or pools on which it can run.
Note: The Scheduler parses all the DAG files every few minutes which can be set by the setting Scheduler parse interval. This means all the top-level code (code written outside methods/classes/operators in the global scope) in a DAG file will run when the Scheduler parses it. This slows down the Scheduler DAG parsing, resulting in increased usage of memory and CPU. To avoid this and pass all operations to the Operator ( like Python Operator, passing methods and creating classes instead of writing code in global scope wherever possible) unless absolutely necessary.
The Scheduler then decides which DAG should run on which pool and based on the Executor configuration it delegates the actual task run to the Executor. It then keeps a watch on which tasks are running and which tasks are up for execution or retries. It also updates all state transitions in the metadata database.
Over the years Airflow’s Scheduler has matured a lot, improving stability and error handling. In the past, there was a need to restart the Scheduler process every few hours, or sometimes it even went into a zombie state where the process was actually running but not processing anything. These issues have been fixed over the years and since version 1.10.0, the Scheduler is a very stable process that can run for days or months without crashing or the need to restart it manually.
Airflow Executor:
The executor in Apache Airflow is the actual entity that runs the tasks. There are various types of Executors in Airflow and any one of them can be selected using the configuration file based on requirements for parallel processing. Let’s dive into some commonly used executors in Airflow:
- SequentialExecutor will only run one task instance at a time. This type of Executor is suited only for debugging or testing a DAG locally before pushing to test the environment. It is also the only executor that can be used with SQLite since SQLite doesn’t support multiple connections.
- LocalExecutor runs tasks by spawning processes in a controlled fashion in different modes. Ideally, the number of tasks a LocalExecutor is unlimited if we specify the parallelism parameter to be 0. But, the number of tasks then is limited by the configuration of the machine being used to run the tasks and the amount of memory and CPU they have available. Arguably, SequentialExecutor could be thought of as a LocalExecutor with limited parallelism of just 1 worker, i.e. self.parallelism = 1. This option could lead to the unification of the executor implementations, running locally, into just one LocalExecutor with multiple modes. Again, this type of Executor is suitable only for running small workloads on a single machine, for higher parallelism we need to be able to distribute tasks to multiple worker processes running on different machines.
- CeleryExecutor is based on python celery which is widely used to process asynchronous tasks. Celery is an asynchronous task queue/job queue based on distributed message passing. For CeleryExecutor, one needs to set up a queue (Redis, RabbitMQ, or any other task broker supported by Celery) on which all the celery workers running keep on polling for any new tasks to run. In the case of CeleryExecutor, the Scheduler adds all tasks to the task queue that we configure. From the queue, the celery worker picks up the task and runs it. After the execution is complete, the worker reports the status of the task in the database. The Scheduler knows from the database when a task has been completed and then runs the next set of tasks or process alerts based on what is configured in the DAG.
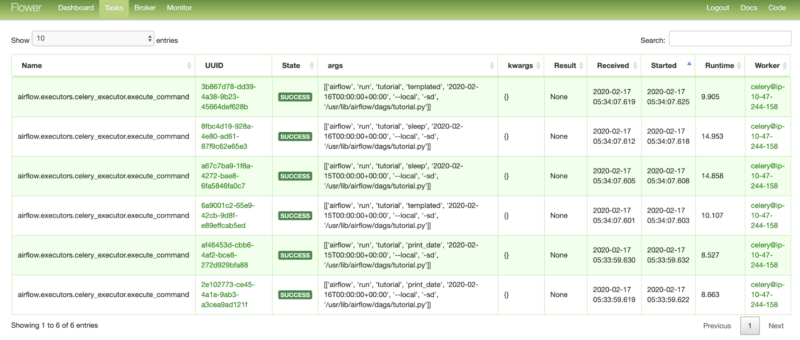
 Flower (The UI for Celery) shows a list of recent task runs
KubernetesExecutor
- KubernetesExecutor provides a way to run Airflow tasks on Kubernetes, Kubernetes launch a new pod for each task. While Kubernetes takes care of the pod lifecycle (as Celery took care of task processing) and the Scheduler keeps on polling for task status from Kubernetes. Kubernetes provides a native way to run tasks in a queue. Airflow takes advantage of this mechanism and delegates the actual task processing to Kubernetes. With KubernetesExecutor, each task runs in a new pod within the Kubernetes cluster, which helps isolate the environment for all the tasks. This also improves dependency management using Docker Images, and up or downscales workers as needed—even all the way down to zero worker processes.
Airflow Metadata Database:
Airflow uses SQLAlchemy and Object Relational Mapping (ORM) written in Python to connect to the metadata database. This means that any database supported by SQLALchemy can be used to store all the Airflow metadata. The metadata database stores configurations, such as variables and connections. It also stores user information, roles, and policies. Finally, the Scheduler parses all the DAGs and stores relevant metadata such as schedule intervals, statistics from each run, and their tasks.
After giving you an overview of Airflow, in this article, we have covered Apache Airflow’s modular architecture in detail. The next blog will focus on installing and running Apache Airflow locally so that we can easily test our DAGs.