How to Install Apache Airflow to Run Different Executors
Now that we know about Airflow’s different components and how they interact, let’s start with setting up Airflow on our workstation so that we can locally test and run the pipelines that we build. There are multiple ways to set up and run Apache Airflow on one’s laptop. In this blog, we explain three different ways to set it up. In each approach, one can use one of three types of executors. We pick one executor per approach, to explain:
- Basic setup using a virtualenv and pip. In this setup, we run SequentialExecutor, which is ideal for testing DAGs on a local development machine.
- Setup using Docker, in which we run CeleryExecutorusing Redis as a queue.
- Kubernetes setup using Helm, for running KubernetesExecutor.
SequentialExecutor
The only thing you need to be installed on your machine for this is Python 3 and the Python package virtualenv. Please do not use Python 2 anymore as it has reached its end of life. The first thing we will do is create a virtual environment with Python 3 in which we will install and run Airflow.
$ virtualenv airflow -p python3
The above command will create a virtual environment named airflow, which we have specified explicitly. In order to use Python3, we use the -p argument; if your system’s default Python version is 3, then you don’t need to specify it.
This should have created a directory named airflow in your working directory. Let’s activate this environment and install Airflow on it.
$ ls -la
total 0
drwxr-xr-x 3 joyc 1294149885 96 Feb 16 00:34 .
drwxr-xr-x+ 102 joyc 1294149885 3264 Feb 16 00:41 ..
drwxr-xr-x 7 joyc 1294149885 224 Feb 16 00:34 airflow

$ source airflow/bin/activate

(airflow) $
Note the (airflow) before your cursor, it indicates the name of the current virtualenv that you have activated.
(airflow)$ pip install apache-airflow
This will install several Python packages that are required by Apache Airflow, including the latest version available. Once the installation is complete, let’s check if we can run Airflow commands on our machine.
If you don’t already have SQLite installed on your machine, please follow this guide to install it as we will need a database to start Airflow—SQLite is the default database, but we can use others too. Airflow uses SqlAlchemy to connect to various database backends and works with all the backends supported by SqlAlchemy but it is recommended to use MySQL or Postgres.
(airflow)$ airflow version
Once you run the airflow version command, you will notice it creates a directory named airflow under your home directory. This airflow directory will contain a file named airflow.cfg which is the config file for your Airflow installation. You can modify the settings in this file and then restart the airflow process so that the changes get reflected.
Now let’s run Airflow. First, we will run the airflow initdb command to set up the Airflow database. If you look at the airflow.cfg file, you will find the sqlalchemy_conn setting that is used to determine the database to use.
$ airflow initdb
Now we are ready to run Airflow Web Server and scheduler locally. Use two separate shell tabs to run both processes and don’t forget to activate the virtual environment in the new tab.
$ airflow webserver
=================================================================
[2020-02-16 01:10:37 +0530] [51577] [INFO] Starting gunicorn 19.10.0
[2020-02-16 01:10:37 +0530] [51577] [INFO] Listening at: http://0.0.0.0:8080 (51577)
$ airflow scheduler
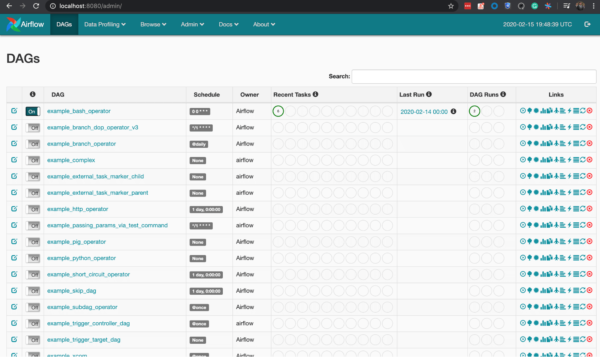
[2020-02-16 01:10:41,661] {dag_processing.py:758} WARNING - Because we cannot use more than 1 thread (max_threads = 2) when using SQLite. So we set parallelism to 1.As the logline above says, the Web Server is listening to port 8080 of your local machine, open localhost:8080 in a browser to access the Web Server UI. Activate any one of the examples dags which are loaded by default by toggling the on-off button and watching it run in the scheduler logs and on the Web Server UI which shows the number of DAGs and tasks running.
[2020-02-16 01:10:45,691] {base_executor.py:58} INFO - Adding to queue: ['airflow', 'run', 'example_bash_operator', 'run_this_last', '2020-02-13T00:00:00+00:00', '--local', '--pool', 'default_pool', '-sd', '/Users/joyc/airflow-installation/airflow/lib/python3.7/site-packages/airflow/example_dags/example_bash_operator.py']
[2020-02-16 01:10:45,692] {sequential_executor.py:45} INFO - Executing command: ['airflow', 'run', 'example_bash_operator', 'run_after_loop', '2020-02-14T00:00:00+00:00', '--local', '--pool', 'default_pool', '-sd', '/Users/joyc/airflow-installation/airflow/lib/python3.7/site-packages/airflow/example_dags/example_bash_operator.py']
If you notice the logs from the Scheduler, you’ll find it has set max threads to 1. This means it can execute only one task at a time, as we are using SequentialExecutor. While this is convenient enough to run and test DAGs locally, this approach can’t be used to run our production workload. This is where other executors like CeleryExecutor and KubernetesExecutor come into the picture, to provide high concurrency in terms of task processing. Let’s now see CeleryExecutor in action.
CeleryExecutor
Celery is a widely-used Python package that makes it very easy to run jobs or tasks in the background. . Common uses include running background tasks on websites, running every workers that send batch SMSs, or running notification jobs at a certain time of the day.
While Celery makes it easy to write and execute jobs, setting things up is a bit tricky as it requires you to set up components like a task queue, a database, and workers, and also handle several configurations to enable interaction between the components.
To make things easier for us and hide some of the unnecessary operational details, we will use docker-compose to run them easily. The only prerequisite is Docker / Docker Desktop and a working internet connection (since Docker will need to download a few container images).
Although the Airflow community is building an official production-ready Docker image, it isn’t complete yet. So, we will use puckel’s docker-airflow to run Airflow. Please make sure your Docker daemon is running before starting the process.
$ git clone https://github.com/puckel/docker-airflow
$ cd docker-airflow
For celery Executor setup, we need to run:
$ docker-compose -f docker-compose-CeleryExecutor.yml up -d

Creating docker-airflow_postgres_1 ... done
Creating docker-airflow_redis_1 ... done
Creating docker-airflow_flower_1 ... done
Creating docker-airflow_webserver_1 ... done
Creating docker-airflow_scheduler_1 ... done
Creating docker-airflow_worker_1 ... done
If you have some custom DAGs of your own that you wish to run, you can mount them on the containers using volumes. To do so, open the file docker-compose-CeleryExecutor.yml and edit the volumes section of each service with the path where your DAGs are stored.
volumes:
- ./dags:/path/to/your/dags/directory/
The docker-compose command will take some time to execute as it downloads multiple docker images of Redis, Airflow, and Postgres. Once it completes, we will be able to access the Airflow Web Server localhost:8080 and play with DAGs as we were doing in the SequentialExecutor section. To see all the components of Airflow running on your system, run the following command:
$ docker-compose -f docker-compose-CeleryExecutor.yml ps

The above screen shows it’s running six containers:
- Webserver – The Airflow UI, can be accessed at localhost:8080
- Redis – This is required by our worker and Scheduler to queue tasks and execute them
- Worker – This is the Celery worker, which keeps on polling on the Redis process for any incoming tasks; then processes them, and updates the status in Scheduler
- Flower – The UI for all running Celery workers and its threads
- Scheduler – Airflow Scheduler, which queues tasks on Redis, that are picked and processed by Celery workers.
- Postgres – The database is shared by all Airflow processes to record and display DAGs’ state and other information.
Now the obvious question here is since we already have CeleryExcutor which is able to scale very well and we can run multiple Celery workers at once, what is the need for another Executor? Although Celery can help you gain a good level of concurrency, it is not the first choice for a higher scale. Some of the reasons include the need to scale workers on demand; a common database that might get affected by constant polling; and constantly running Celery worker threads. This is where Kubernetes and the KubernetesExecutor come into the picture. Kubernetes’ highly efficient Scheduler is one of the reasons most queue-based task processing systems have started to migrate towards Kubernetes. It provides a native way of running work queue-based systems very easily on its platform. This means that for every task, we request a pod from Kubernetes to perform the task, thus eliminating the need for autoscaling. Plus there’s no need to use a custom queue and pre-provisioned Celery worker processes. While Kubernetes is responsible for managing the pod lifecycle, the Scheduler constantly keeps on checking the status of the task using Kubernetes APIs. This makes a few other things like dependency or DAG management a little trickier, as we need to maintain consistency across each pod. That said, the advantages of delegating task processing responsibility to Kubernetes are enormous in terms of efficiency and reliability. So let’s see the Kubernetes Executor in action.
KubernetesExecutor
Although the open-source community is working hard to create a production-ready Helm chart and an Airflow on K8s Operator, as of now they haven’t been released, nor do they support Kubernetes Executor. So if we want to run the KubernetesExecutor easily, we will have to look for different ways. While looking for KubernetesExecutor-based charts for Airflow, we found a repository (https://github.com/BrechtDeVlieger/airflow-kube-helm) on GitHub that is a fit for our use case and decided to use the same for this blog but since it was quite old and didn’t support the latest version of Kubernetes/Airflow, we had to take a fork out of it and make the required changes.
Let’s start with cloning the repository.
$ git clone https://github.com/chattarajoy/airflow-kube-helm
$ cd airflow-kube-helm
Most openly available Airflow Docker images don’t come with the Kubernetes plugin pre-installed in the image. The official image size is more than one Gband mostly used for running the CI pipeline, so we will avoid that too. It is very easy to build your own image since this repository comes with a script to do so.
$ ./examples/minikube/docker/build-docker.sh
.
Removing intermediate container ecdb3b6fea54
---> ced46d6eda5c
Successfully built ced46d6eda5c
Successfully tagged airflow:latest
Our image has been successfully built. Now let’s use Helm to install the Airflow chart on our local Kubernetes setup. For this, you can use both Minikube or Docker Desktop’s Kubernetes mentioned in the previous method. Once you have a local Kubernetes cluster running, you need to install kubectl and install Helm. Once this completes, we can start deploying Airflow.
$ cd airflow
$ kubectl create ns airflow
$ helm --namespace airflow airflow install .
The above helm command uses deploys the templates mentioned in the current directory to the current Kubernetes cluster. Read more on helm charts here. Run this command to check the status of your Airflow pods and wait until all the pods get into a running state.
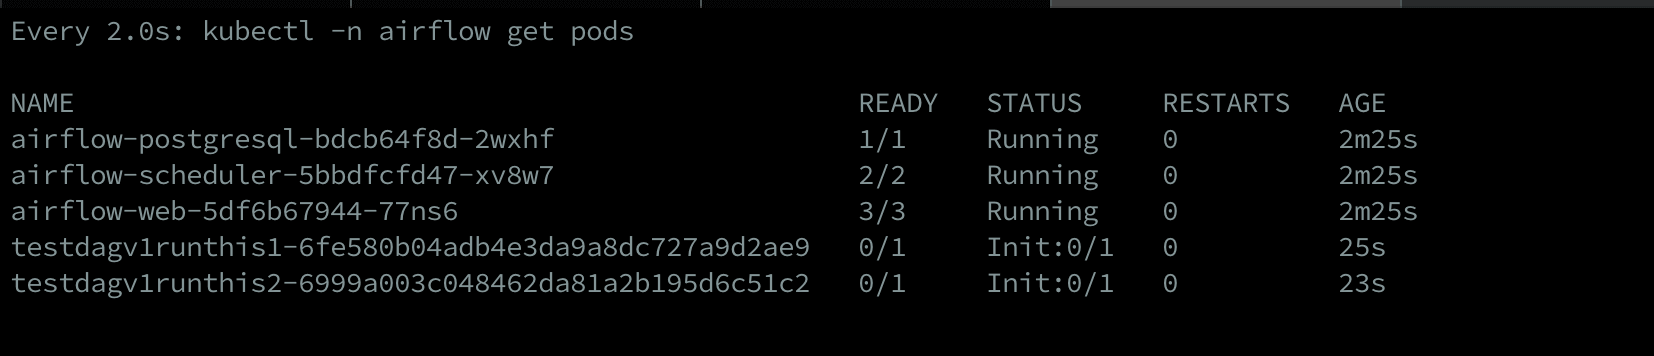
$ kubectl -n airflow get pods

It might take a few minutes for Kubernetes to start all the pods. After all the pods are in a running state, we can now access the Airflow Webserver. To Access the Web Server we need to find out the port on which it is running, by running the following command:
$ kubectl get svc -n airflow

Look at the service airflow-web, the port will look something like 8080:<3…>. The latter part is the port we can use to access our Web Server. In this case, it is 30926, so we can access it on localhost:30926
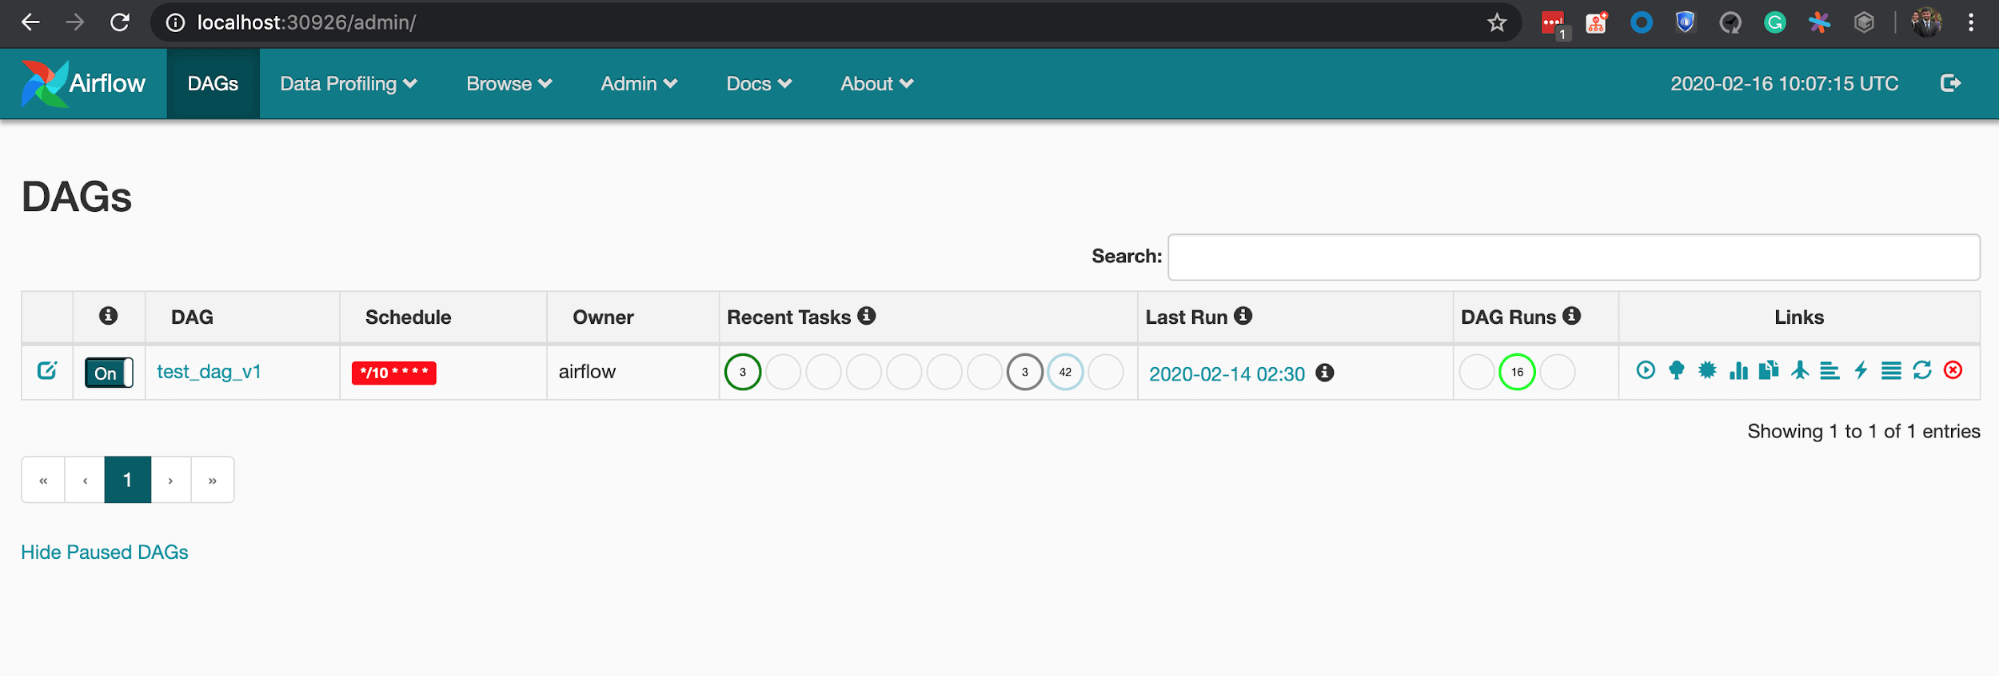
Once we have access to the Web Server UI, we can trigger the sample DAG that’s already present. When we do so, it is important to note that for each task, Airflow creates a new pod on the Kubernetes cluster—that’s KubernetesExecutor in action.
For details on how to upload custom DAGs to this Airflow setup, please refer to the readme section of https://github.com/chattarajoy/airflow-kube-helm.
So, now we know three different types of commonly used Airflow Executors and how they actually run the tasks. The next step is to get started and write some actual DAGs that solve real-world use cases, which we will cover in our next blog.
For a list of all our blogs on Airflow, click here.